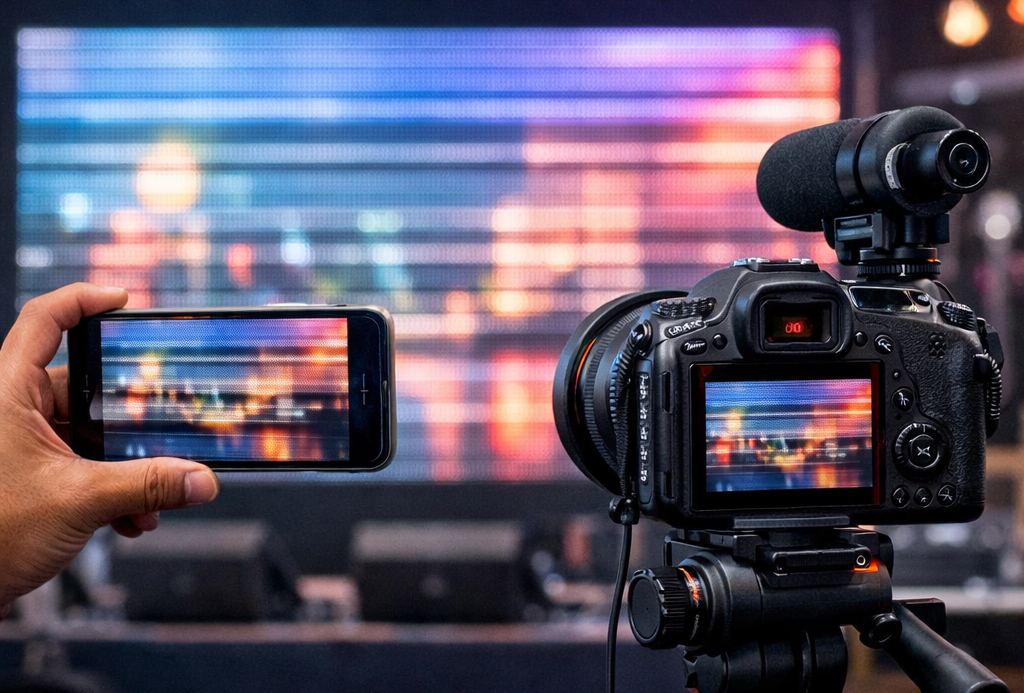
Your LED video wall looks amazing in person, but the moment you record it on a phone or camera, you see moving black lines, rolling bands, or a pulsing flicker. If you’ve searched things like “LED wall banding lines on camera” or “LED video wall flickering in iPhone video”, this guide is for you.
The good news: in most cases, the screen is not “faulty.” The issue is usually a mismatch between the LED wall’s driving behavior and the camera’s frame capture.
In this post, you’ll learn:
- why an LED video wall flickers on camera
- what LED display refresh rate really means
- how scan rate and driver IC affect banding
- the best camera settings to stop LED wall flicker
- what to ask for when buying a camera-friendly LED video wall for filming
Why does an LED video wall flicker on camera?
Most LED walls control brightness using fast electronic pulses. Your eyes naturally “average” these pulses, so the image looks stable. But cameras capture video in frames, often using rolling shutter—so they can record the LED’s pulse/scan behavior as bands or flicker.
Common symptoms:
- black lines on LED screen when recording video
- LED wall flicker in phone camera
- LED display banding in DSLR / mirrorless
- LED wall looks fine to eye but flickers on video
- rolling lines on LED screen in video
The 3 real causes of LED wall banding and flicker
If you want a flicker-free LED video wall for live streaming or stage filming, you need these three things to work together:
- LED display refresh rate (Hz)
- LED module scan rate / driving method (1/8, 1/16, 1/32 scan)
- Camera frame rate + shutter speed (your filming settings)
Let’s break it down.
1) LED display refresh rate explained (and why it’s not the whole story)
Refresh rate is how many times per second the LED wall updates the image. Higher is generally better for filming.
You’ll often see:
- 1920Hz refresh rate
- 3840Hz refresh rate LED wall
- 7680Hz LED screen refresh rate
Long-tail takeaway
If filming matters, ask specifically for a high refresh rate LED video wall for camera recording.
But here’s the catch: even with high refresh rate, some walls still show banding because of scan rate and driving electronics.
2) LED scan rate and driver IC (the “hidden” reason flicker happens)
LED modules often use scanning (driving LEDs in groups rather than continuously). That’s why you’ll see specs like:
- 1/8 scan LED module
- 1/16 scan LED display
- 1/32 scan LED panel
Why scan rate matters for cameras
Two LED walls can both claim “3840Hz refresh rate” and still behave differently on video because the scan rate and driver IC influence how the LEDs are pulsed.
If you care about video performance, ask your supplier:
- What is the refresh rate (Hz)?
- What is the scan rate (1/8, 1/16, 1/32)?
- Which driver IC is used?
- Can you share a camera test video (phone + DSLR) showing no banding?
If you’re exploring product categories, start here and narrow down by use case:
3) Best camera settings to stop LED wall flicker (iPhone, Android, DSLR)
If you need a quick on-site fix, camera settings can solve a big part of the problem.
Best shutter speed for filming an LED video wall in India (50Hz)
In India (50Hz region), these combinations often reduce banding:
For iPhone / Android (Pro mode or manual camera app):
- 25fps + 1/50 shutter
- 50fps + 1/100 shutter
- Lock exposure (avoid auto brightness changes)
For DSLR / mirrorless:
- Start with 25fps at 1/50
- Or 50fps at 1/100
- Avoid very fast shutters unless necessary (fast shutters can reveal scan artifacts)
Long-tail phrases people search:
- best shutter speed for filming LED wall
- how to stop LED screen flicker on iPhone
- LED video wall banding fix
- rolling shutter lines LED screen
LED video wall flicker fix checklist (practical steps)
Step 1: Identify what you’re seeing
- Moving black bands → shutter + scan mismatch
- Brightness pulsing → auto exposure or PWM dimming behavior
- Shimmer patterns → moiré (often pixel pitch + distance related)
Step 2: Lock filming settings (don’t leave on auto)
- Lock FPS and shutter speed
- Start with 25fps/1-50 or 50fps/1-100
- Lock exposure and ISO if possible
Step 3: Check LED wall output stability
- Ensure the controller/processor output is stable
- Avoid resolution switching or unstable sources
- Don’t run brightness extremely low during filming if possible
Step 4: If it still bands, it’s a spec/design limitation
That’s when you need a more camera-friendly LED display:
- higher refresh rate
- better driver IC
- more camera-friendly scan design
- higher-quality controller/processor
What to ask before buying a camera-friendly LED video wall (RFQ checklist)
If your LED wall will be used for:
- stage events
- product launches
- retail reels and influencer filming
- corporate townhalls
- houses of worship live streaming
- studio or broadcast
…add these questions before you finalize:
Ask for proof (not just numbers)
- “Can you share a phone video test showing no banding?”
- “Can you share a DSLR/mirrorless test as well?”
- “What are the refresh rate and scan rate for this module?”
- “Which driver IC is used?”
- “Which processor/controller is recommended for flicker-free filming?”
Also confirm installation readiness
If installation and stability are part of your project, these guides help avoid surprises:
- LED Video Wall Installation & Commissioning
- LED Video Wall Installation Requirements in India: Power, Earthing & Structure Checklist
Best LED video wall for retail showroom filming (phones + reels)
Retail showrooms are a special case because customers constantly record the display.
If you need an LED video wall for retail showroom filming, use this approach:
- choose camera-friendly specs (refresh rate + driver IC)
- test with both iPhone and Android before final handover
- avoid very low brightness during filming
- use content with clean shapes (thin lines can shimmer on camera)
Indoor category options:
Best LED video wall for stage events and live streaming
For events and live feeds, you need a flicker-free LED wall for stage and cameras.
Checklist:
- confirm high refresh rate + stable controller/processor
- ask for a real camera test (not just a spec sheet)
- use filming settings aligned with 50Hz regions
For outdoor venues or bright environments:
Frequently Asked Questions
Phones use different rolling shutter behavior and exposure processing. Try manual settings and lock FPS + shutter.
Often yes, but scan rate and driver IC can still cause banding. Always verify with a camera test video.
In 50Hz regions, start with 1/50 at 25fps or 1/100 at 50fps, then fine-tune if needed.
Lock exposure, set a compatible FPS/shutter speed, and ensure the LED wall is built for camera-friendly driving.